New Side Bases – New Project!

I recently had the opportunity to upgrade my side bases to a more realistic model. This version offers many additional details, including a storage receptacle for a flashlight, backlighting for the tiller scale, and also the assembly for the floor light.
Naturally I wanted to add the ability to make the floor lights functional, using the switch located on the main instrument panel.
This blog post captures the design I chose to implement as well as the electrical schematics and a list of parts used for the project.
Light Bulbs
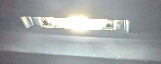
The light cover comes with the necessary electrical connections but no light bulb. The first step was thus to find an appropriate light bulb, that would physically fit and ideally use 12 V as this voltage is widely available in the cockpit.
I found some nice LED bulbs with the perfect dimensions and the appropriate connectors.


Light Controller
The switch controlling the floor light is located on the Main Instrument Panel (MIP). It is a 3-position switch allowing to set the light to the Off, Dim, or Bright position. By default the switch on the Skalarki panel is not wired to anything and is relatively accessible.
However one of the challenges is that it is an On/Off/On switch, whereas the logic for the floor light is Off/On (dim)/On (bright). After consultation with Vier-Im-Pott I followed their recommendation to use a relay to implement the required logic. After prototyping with individual 12 V relays I decided to purchase a 2-relay board for the final implementation as it has a slightly smaller footprint and keeps things tidy.
For the dimmer I chose to use a small DC motor speed controller to provide the necessary Pulse-Width Modulation (PWM) to dim the LED lights. This allows adjusting the desired illumination for the “Dim” switch position. Once satisfied with a particular setting, the dimmer knob is left in that position.

After verifying the desired functionality, all components were placed in a small electronics project box. As an extra convenience everything can be wired together using screw terminals. No need for any soldering.
The controller box is located right behind the MIP. Outside of the controller box a small screw terminal block is used for connecting to the switch on the MIP. The two round DC connectors provide the connections to the 12 V DC source and to the floor light in the side base. This allows to easily disconnect the controller if need be.
And voila! The two switches on the MIP, one on each side, are now functional and allow each pilot to illuminate the floor area aft of the new side bases.

Schematics
The schematics below captures the electrical circuit I used.

Bill of Materials
Here is the list of parts I used for this project. I’m sure there are many equivalent parts that could be used.
| Item | Quantity | Supplier | Notes |
|---|---|---|---|
| LED Bulb | 2 | Serundo Auto | Model 6418: 36mm, 12V, 6000K white |
| Dimmer Board | 2 | Tatoko | Model 1803BK: PWM, 12V, 2A |
| 2 Channel Relay Board | 2 | HiLetgo | Model B00LW15F42: 12 V, 2 Channels |
| 10 kOhm Resistor | 2 | Any | 0.25W, 5% tolerance |
| 2 Conductor Wire | 5 m | Haerkn | 22 AWG |
| Barrel Connector | 4 pairs | DAYKIT | Model DC001: 12V, 2.1×5.5mm, Male + Female |
| Screw Terminal Block | 10 pairs | ERKOON | Model B0943N3PBF |
| Wire Crimp Terminal | 10 | XHF | 22-16 AWG, Female |
| Prototype Plastic Box | 2 | PINFOX | Model PF100625: 100mm by 60mm by 25mm |
| Strain Relief Bushing | 4 | Hilman Group | Model B00MFSF4FQ: 0.5 in |